30+ Super Cool Excel Tips and Tricks in 2023: Microsoft Excel is a part of the Microsoft Office package that facilitates users in completing many useful tasks such as maintaining an individual budget or logically organizing unique records by using rows and columns.
Apart from that, Excel also provides an end number of features, such as formulae and functions. For example, function keys assist a user in handling various seemingly difficult tasks and making them easy and efficient.
Excel is much deeper than most of us think!
In this guide, our special expert team has brought some amazing tips and tricks that will make you pretty sharp in Excels, and undoubtedly, these tricks will assist you in saving time & effort!
Now, let’s go deeper!
30+ Super Cool Excel Tips and Tricks in 2023
Wait, we’ve got to promise a few things!
In the end, you’ll be perfect enough to follow advanced excel tricks & tips to become proficient in handling tasks related to Microsoft Excel:
- How To Transpose Data From A Row To A Column
- Hiding Rows And Columns With A Shortcut Key
- How To Add The Current Date & Time Without Typing
- How To Remove Duplicate Data Points Or Sets
- Adding Dropdown Menus In Excel Sheet
- Auto filling In Excel Sheets
- Perfect use of pivot tables
- Hiding a whole sheet
- Some tremendous modern-day excel sheet formulae
And that’s just the trailer of our Super Cool Excel Tips and Tricks guide! The bigger tricks we won’t even mention here! But, we’ll keep that suspense!
Now that we have outlined a brief introduction, let’s learn all of these skills by going in-depth. We bet you’ll become a Microsoft Excel expert within the next few minutes, with these valuable skills under your belt.
6 Super Cool Excel Tips and Tricks For Beginners (How To Use Excel PHASE #1)
It would help if you had rapid solutions and steps for overcoming any obstacle you’ve come across. We bring some simplest, fastest, and most modern solutions for you! Learn these, and you’ll find working with excel sheets fun! Most importantly, you’ll be conveniently implementing the following tricks without needing to read them twice!
Selection of rows and columns with a shortcut key Is selecting rows and columns wasting your time?
Wait, there’s a shortcut!
To select the entire row, just press Shift + Space. To select a column, press Ctrl + Space.

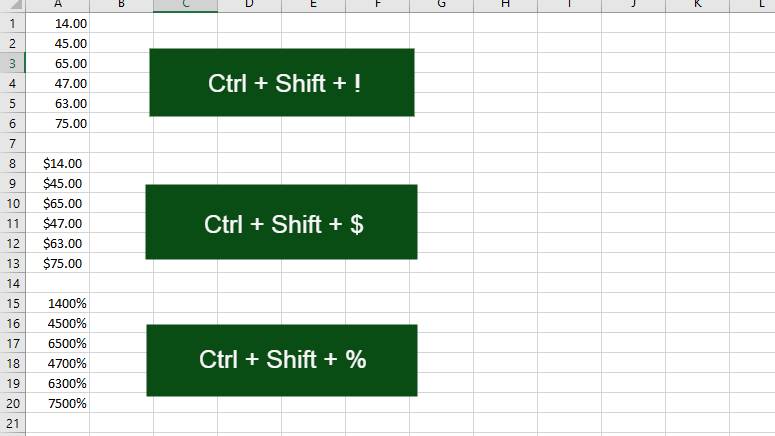
How to Add signs with shortcut
- To transpose a number with two decimal points, use Ctrl + Shift +!
- For dollars, use Ctrl + Shift + $
- For percentages, use Ctrl + Shift + %
How to Find data and replace it in excel
When working with lots of data, you sometimes struggle to find a specific word or phrase in the excel sheet. The find feature can help by searching that word or phrase in the sheet. Just press Ctrl + F, and a window will open.
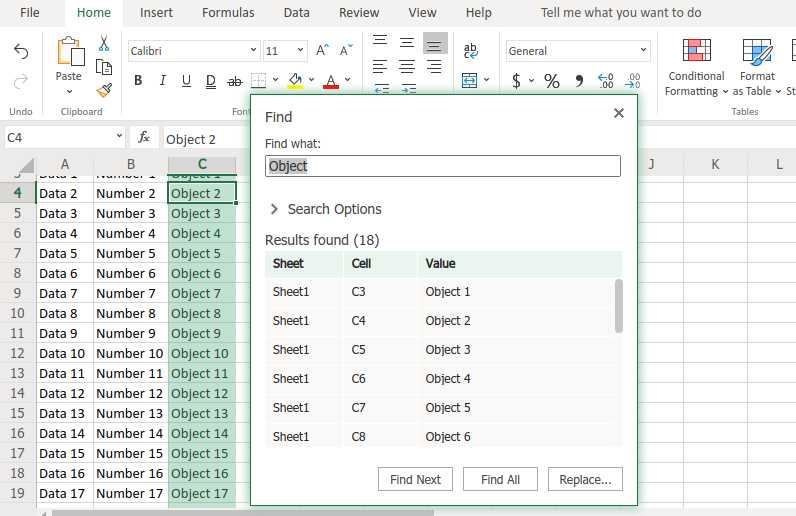
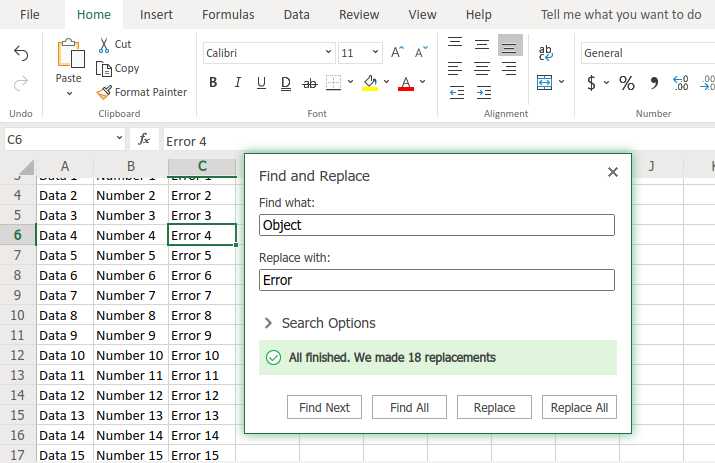
After that, type the word, and you can conveniently find that word one by one or click on find all. After that, go to replace tab and then write the word you want to replace and click OK. It’s as simple as that!
How to add a strikethrough
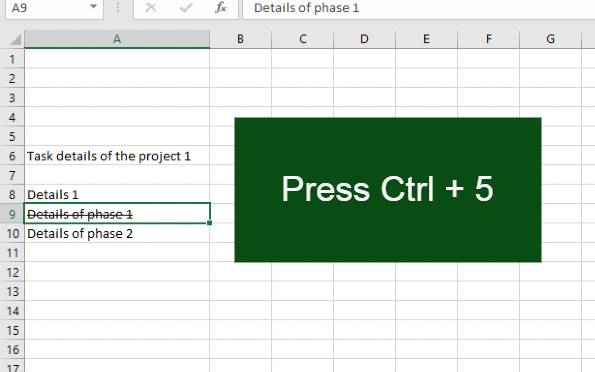
Those who work with MS Excel may often use the strikethrough option to show that a task has been completed or checked off.
- To add a strikethrough, select the cell you want to apply the strikethrough format and press Ctrl+5.
- If you want to apply the strikethrough to a range of cells, select the entire range of cells, and use this same shortcut.
How to hide data from the worksheet
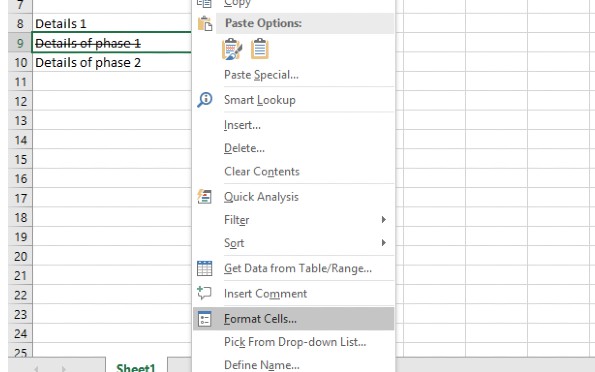
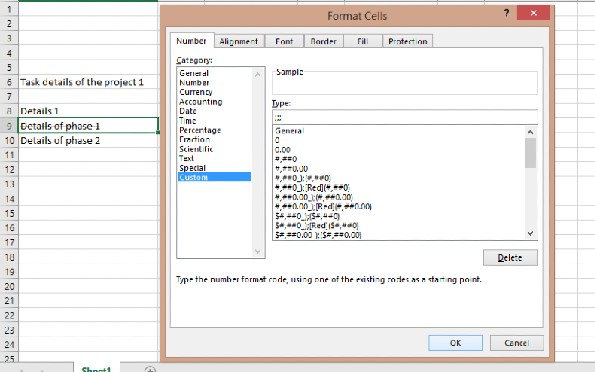
Select the cells you want to hide from your excel sheet and perform the simple steps. Right-Click -> Format Cells -> Custom -> ;;; (Three semicolons).
Easy way to make a borderline of a selected cell
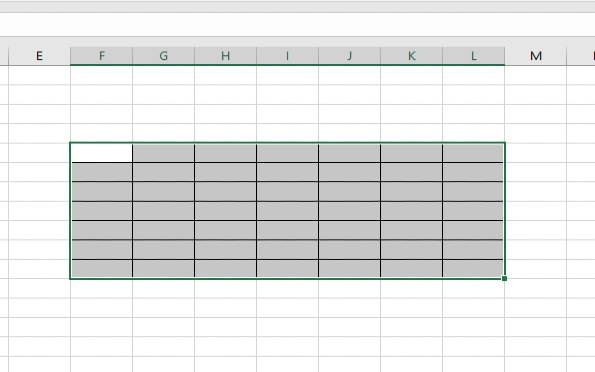
Using Excel shortcuts is the easiest way to make the borderline of your cell. Start by following this method: Select the area you want to border and press Ctrl+shift+&.
Here we finish our cool Excel Tips and Tricks for beginners, and the next segment is for semi-intermediates! There’s much knowledge juice over there!
7 Super Cool Excel Tips and Tricks For Semi-intermediates (How To Use Excel PHASE #2)
The following Excel tips are for those rolling on with sheets, but it hasn’t been so long! Saving time is easy, as there are numerous tricks available for semi-intermediates! We’ve filtered seven to Cool Excel Tips and Tricks!
Easy way to insert a row and a column with a shortcut key
Select an entire row and press Ctrl+shift+ Plus(+) to create one row below. For deleting a row, select that entire row. If you want to delete several rows, press Ctrl and drag it. To delete the row press Ctrl+Shift + Minus(-). Remember that will delete any selected rows.
To create a new column, follow the same previous steps. Select the entire column, and press Ctrl+shift+Plus(+). A new column will then add a new column to the right side. Select the entire column and press Ctrl+Shift + Minus(-) to delete a column.
It is the quickest, easiest way to add rows and columns. Use the Ctrl+Shift+Plus(+) sign. The same method is used to delete a row or column. Simply click Ctrl+Shift + Minus(-) sign.
How to add the current date & time without typing
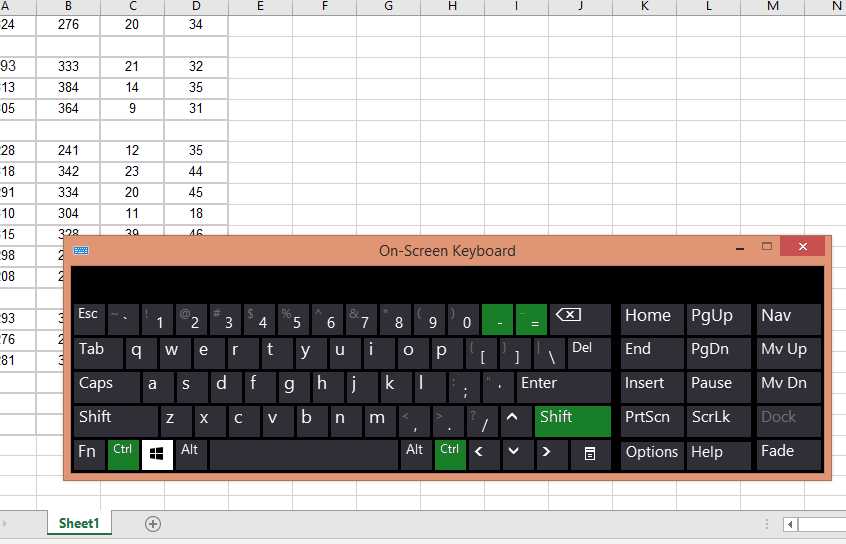
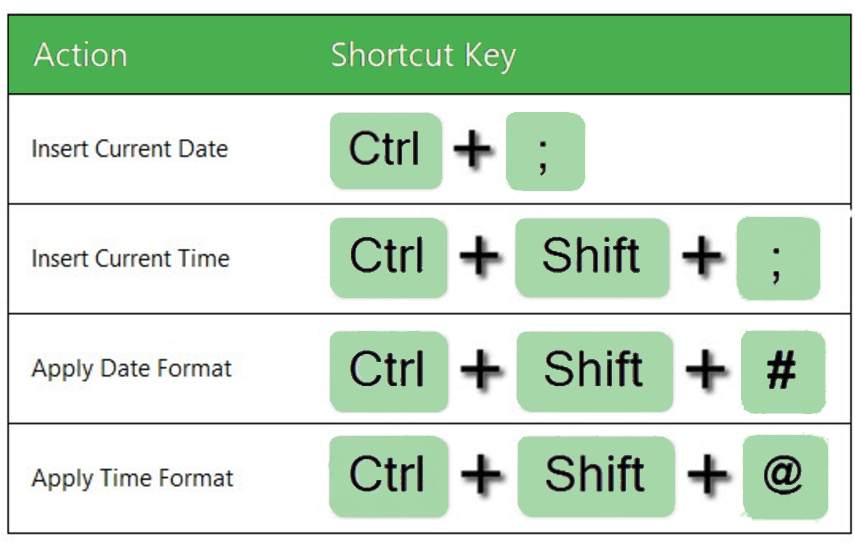
- To add a current date in a cell, press Ctrl +. If you would like to add the current time, then press Ctrl+Shift+.
- To change the date format, use Ctrl+Shift+#. Likewise, if you would like to change the time format, use Ctrl+shift+@.
How to hide rows and columns with a shortcut key
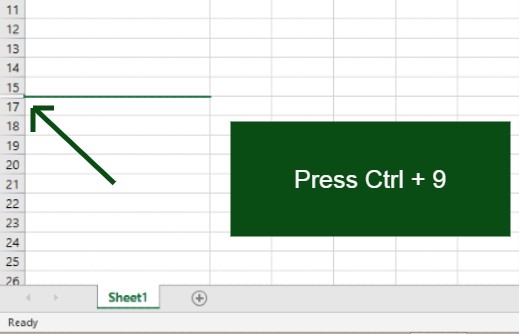
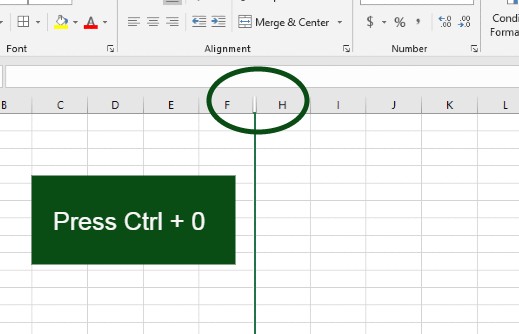
- To hide a row, select any cell from that row and press “Ctrl+9.” To hide any column, select any cell from that column and press “Ctrl+0.”
- To hide multiple columns and rows, select multiple cells and press Ctrl+9 to hide columns and Ctrl+0 to hide a row.
A shortcut of autosum without typing or using a mouse
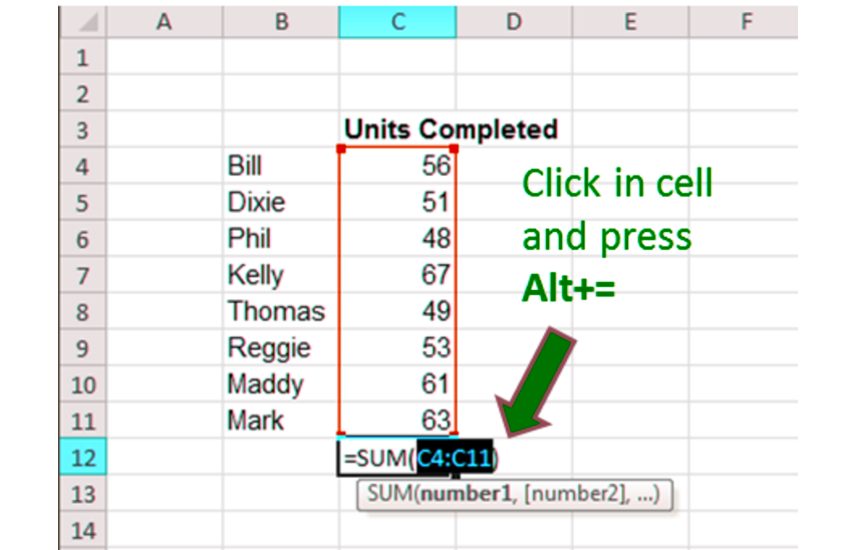
Normally we select the area and then click on autosum to calculate the amount, or we complete this by the formula. However, to make this faster and easier, you can select the area and press ALT+ Equal(=) to get a total sum or amount.
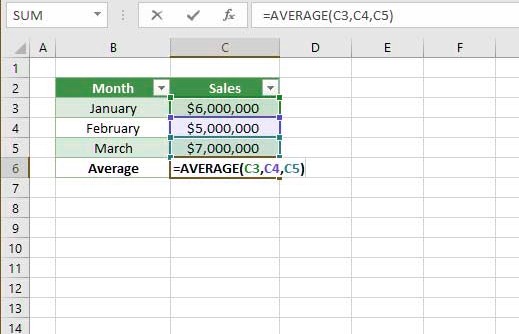
Getting the average of numbers inserted in your cells
Are you looking to average up the numbers in the cells? Just use the formula =AVERAGE (Sell Range). For summing the column of numbers, apply the formula =SUM (Sell Range).
Hyperlink a cell to a website
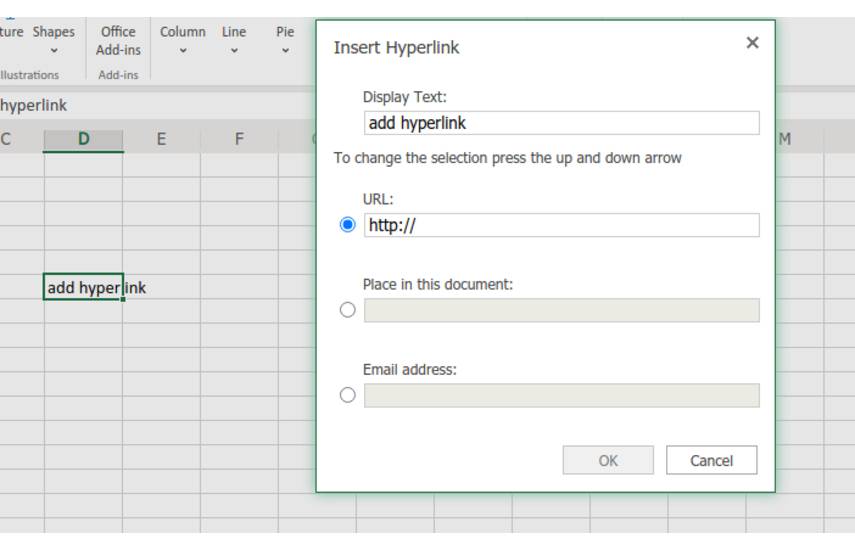
Certainly, hyperlinking the cell can be beneficial if you’re using the Excel sheets for the website and social media metrics. It supports having a reference column with all links that each row is tracking. Whenever you directly add a URL into Excel, it must be clickable automatically.
However, in the case of hyperlink words, for example, the headline of the post, or page title you’re tracking, you should:
- Highlight those words which you need to hyperlink.
- Now, press Ctrl+K. You’ll see a box pop up, permitting you to paste your hyperlink URL.
- Copy & paste your URL into that small box. After that, hit enter.
- Sometimes, the shortcut doesn’t work for some reason. You can carry the process manually by highlighting the cell and then tapping > Hyperlink.
How can I turn text into columns?
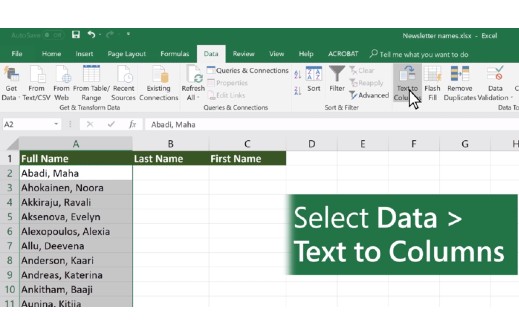
Among the Excel Tips and Tricks, turning text to the column is popular! You’ve got a names-filled column, first next to last, and you are looking for two columns that break them out. Do the following:
- Choose the data first. Now, tap the text to columns option on the Data tab (at the extreme top).
- Now, select to separate them by a fixed width or delimiters (based on commas or spaces – decent for CSV data values).
- You use fixed-width when all your data is stuffed into the first column; however, separated by a definite number of periods and spaces.
- The remaining is like magic, with extra choices for certain numbers.
10 Super Cool Excel Tips and Tricks For Intermediates (How To Use Excel PHASE #3)
For the intermediates, we’ve got a bunch of 9 tricks! When you’re already an intermediate Excel sheets handler, pushing your level further isn’t tough! Read the following 9 awesome tricks, and you’ll find yourself much smarter. We bet that!
How to Remove duplicate data points or sets
When you have larger data sets, there might be some duplicate content, which is a big hassle to remove manually. Often, you get a listing of multiple contacts, company numbers, products, etc. In such situations, you look for some shortcut to remove the duplicates to attain a perfect list, with no value repeating itself.
- To remove all duplicates, highlight the column or row you want to eliminate duplicates.
- Now, reach the data tab, and choose “Remove Duplicates” (under Tools).
- You’ll see a confirmation pop-up concerning the data you want to work with it.
- Tap Remove Duplicates,” and that’s it!
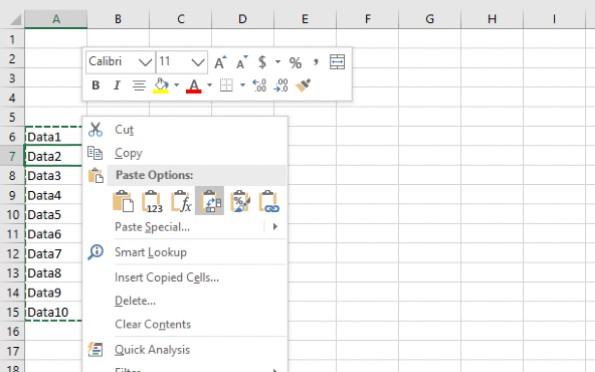
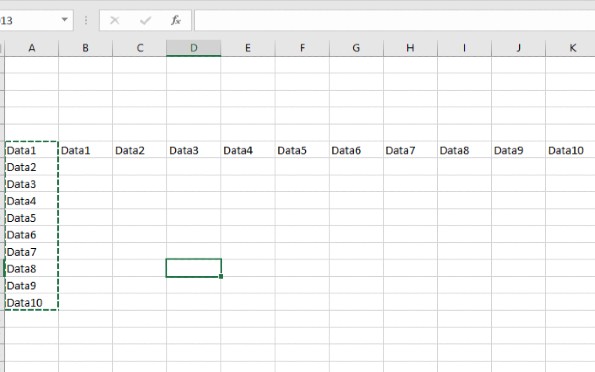
How to Transpose rows into columns
Moving down our Excel Tips and Tricks listing, we’ll simplify the process of transposing rows into columns!
When you’ve got fewer data rows in your spreadsheet, we feel the need to transform the items in one of such rows into columns pretty often.
Copying and pasting each header consumes much time. Here, the transpose feature comes into play. It permits you to complete that task by moving your row data into columns.
- Highlight the column you’re planning to transpose into rows.
- After right-clicking, choose “Copy.”
- Choose the cells on your sheet where you desire your first row/column to start.
- After right-clicking the cell, choose “Paste Special.”
- You’ll see a module. At the bottom, an option to transpose will be visible.
- Now, check that box and tap OK.
- It will conveniently transfer your column to a row.
How to add a checkbox in the Excel sheet
Are you utilizing the Excel sheet for tracking customer data and looking to supervise something that isn’t quantifiable? Checkboxes and be inserted into a column in such a case!
For example, suppose you’re using an Excel sheet for sales prospects’ management and ensure proper tracking concerning whether it was the last quarter when you called them. In that case, you can have a “Called this quarter?” column and further check off the cells in it concerning when you’ve called the corresponding client.
Let’s explain how to do that in Excel
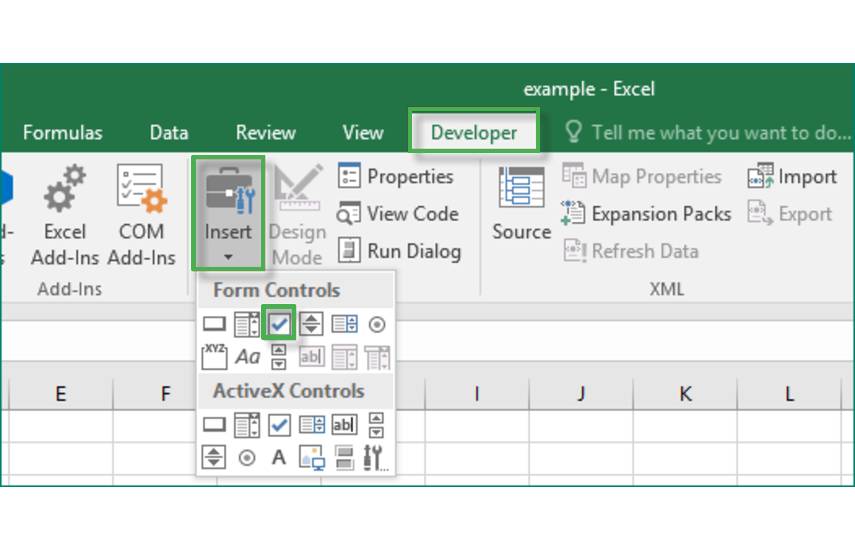
- Highlight a cell you prefer to add checkboxes to in the spreadsheet.
- Tap DEVELOPER.
- Under FORM CONTROLS, tap the checkbox.
- Copy it once the box is visible in the cell.
- Highlight the cells you prefer it to appear in. Now, paste it.
How to add dropdown menus in Excel sheet
Are you utilizing your spreadsheet for qualitative things, such as tracking stuff? Writing words repetitively, such as “Yes,” “No,” “Sales Lead,” “Customer Stage,” etc., consumes much time. Dropdown menus highly help here.
You can quickly mark descriptive things regarding your contacts, products, services, or whatever you’re tracking. For adding dropdowns to your cells:
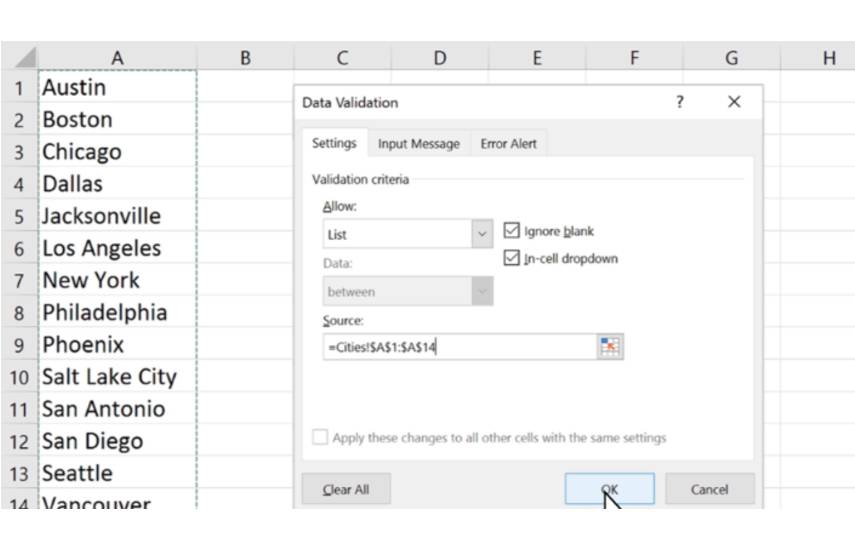
- Highlight those cells, and you desire to insert the dropdowns.
- Next, click the Data menu that you find in the top navigation.
- A Data Validation Settings box will be visible.
- Consider “Allow options” and tap “Lists.”
- Select Dropdown List.
- Press OK after checking the In-Cell dropdown button.
Dealing with Line Breaks and Wrapping Text
We all find it so frustrating to type into spreadsheet cells because the default for whatever you’re typing is to continue forever, and it will not wrap back down to a new line. Surely, changing that is possible!
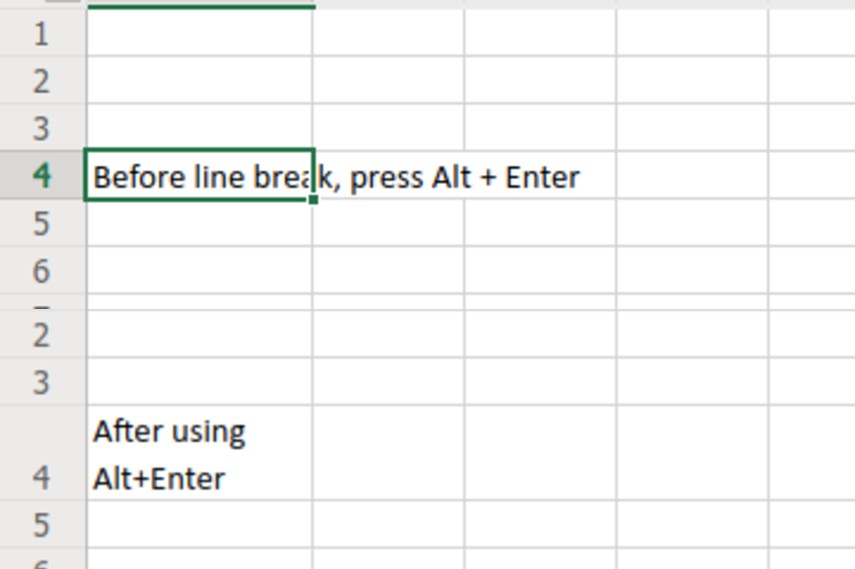
Type Alt+Enter (hitting Enter as single will take you out of the cell) to create a new line. Next, click the Wrap Text option. You’ll find it at the screen’s top, under the Home tab. The wrap text option means all text will wrap right at the cell’s edge (the cell you’re in). Resize the row/column, and you’ll see the text re-wrapping to fit.
Ctrl+Shift to Select: A true-time savior!
Currently, selecting a dataset can be done much faster than dragging the cursor using the mouse.
- Slick your first selected cell, and hold down Ctrl+Shift.
- Hit UP arrow for getting everything in the column above), or DOWN arrow for getting everything in the column below, or you can select left or right arrow for getting everything in the row (undoubtedly, to the left or right)
- Now, Combine the directions for getting a whole column and everything in the rows (available on right/left).
It’ll only choose cells with data (including invisible data). If Ctrl+Shift+End is what you’re using, the cursor will jump to the lowest cell (right-hand) with data, selecting everything falling in between.
Hence, if the cursor is present in the A1 cell (upper-left cell), that’s everything. Taster than that: Ctrl+Shift+* (the asterisk) will select the whole data set, regardless of what cell is selected.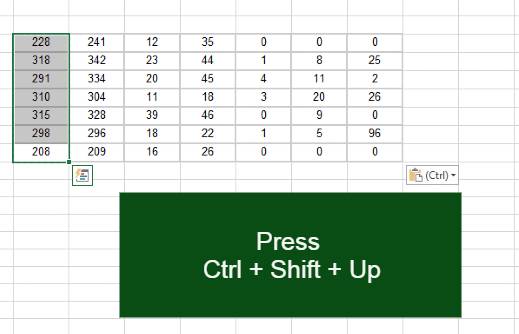
How to autofill in Excel Sheets
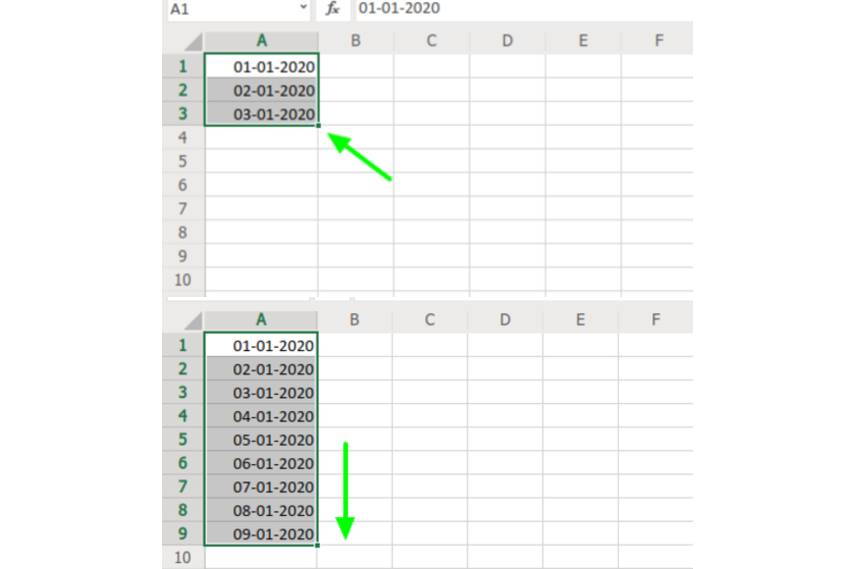
It’s a no-brainer, though. Still, it’s overseen by even the intermediates! If you’ve got a long day, you can surely type a series of repetitive things, such as dates (1/1/20, 1/2/20, 1/3/20, etc.) to kill your boredom.
But that’s not smart! To save time:
- You can start the series and further, move the cursor on your screen to the last cell’s lower-right part—the fill handle.
- You’ll notice it turning into a plus sign (+); you have to click and select the cells you’re looking to fill.
- You’ll find them magically filling, using the pattern you began. You can use the same for going up a column or right/left on a row.
Looking for a better option? Auto filling without much of a pattern is possible. Move the fill handle after picking a cell/cells, and you’ll get a menu with options. The more data you insert at first, the better the Fill Series function generates your AutoFill options.
How to Flash in Excel Sheets
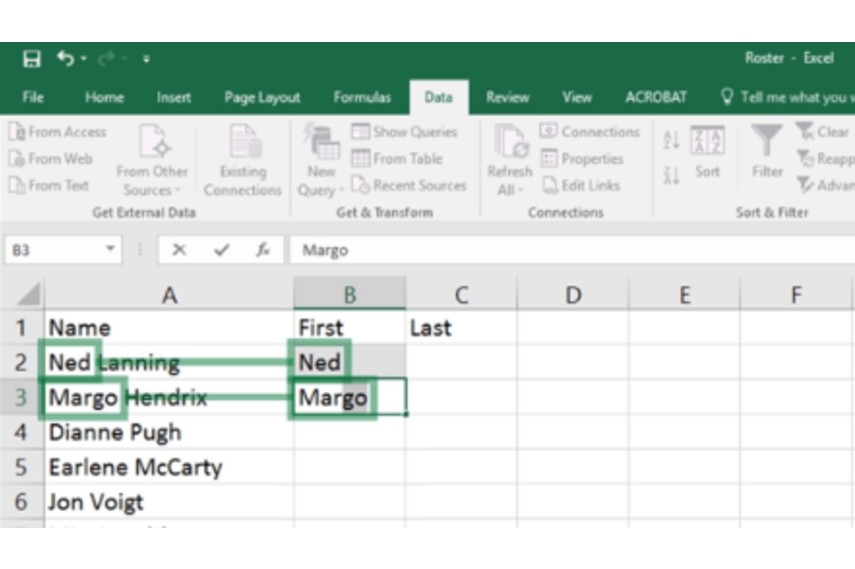
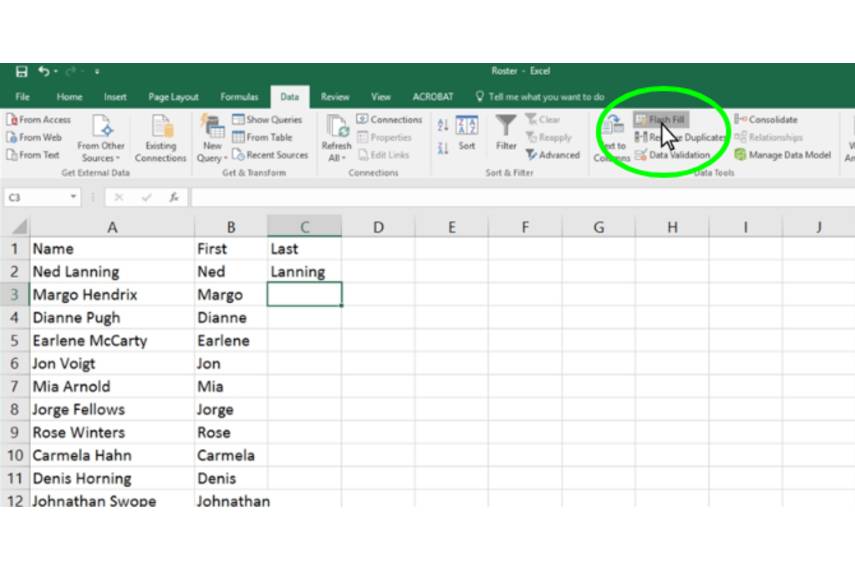
We know the Flash Fill feature for filling columns based on the data pattern in the first column. This thing helps when your top row is a distinctive header row. For instance, if the first column consists of phone numbers formatted like “2126083111,” and you want them to appear like “(212)-608-3111,” begin typing.
Excel recognizes the pattern and displays what it believes you want by the second cell. For using them, hit “enter.” For example, ts works with names, dates, numbers, etc.
If the second cell isn’t giving you an accurate range, prefer typing something more because the pattern might be tough to recognize. You can click the Flash Fill button after reaching the data tab.
How to Paste Special with Formulas in Excel Sheet
Now, the situation arises when there are a lot of numbers in decimal format, and you want to express them as a percentage. Numeral 1 shouldn’t be 100%; that’s the problem. That’s what Excel provides you in case you tap the Percent Style button (or tap Ctrl+Shift+%).
1 should be 1%, that’s what you want, and for that, you have to divide it by 100. Paste Special marks its importance at that time!
- Firstly, type and copy 100, and after that, select all those numbers you want to be reformatted.
- Choose Paste Special, and tap the “Divide” radio button.
- You’ll see all numbers converted to percentages.
The same works to quickly add, multiply, or subtract numbers, certainly!
Use filters to simplify your data
While looking at very large data sets, you certainly don’t need to look at every single row on the sheet simultaneously. Instead, you only prefer to focus on data that fit specific criteria on certain occasions. That’s where filters play a big role.
Filters’ job is to permit you to reduce your data and let you look only at the specific rows at a time. You can add a filter to every single column on Excel. Further, you can likewise select any cells you want to view at a specific time.
Click the Data tab to add a filter and select “Filter.” You’ll see an arrow next to your column headers, which you need to click. Now, you’re free to choose your preferred way of arranging data, among ascending/descending. Besides that, you can determine which certain rows you want to display.
4 Super Cool Excel Tips and Tricks For Semi-Advanced (How To Use Excel PHASE #4)
So, you’re no longer an intermediate and are familiar with a few cool Excel tips and tricks, which can impress folks! However, you can’t call yourselves a pro yet, because there’s still much to explore. So, before acquiring any Excel sheets’ related job, let’s make you perfect!
Using Pivot Tables: Recognize and make sense of data
You can use Pivot Tables to reorganize data in your spreadsheet. Certainly, they don’t alter the data you have; however, they can compare various info in your spreadsheet and sum up data as per what you desire them to do.
For creating a Pivot Table, go to data> Pivot Table. You’ll find Excel populating your Pivot Table. You can change your data’s order.
- Report Filter: It permits you only to consider certain rows in the dataset.
- Column Labels: These could be your dataset’s headers.
- Row Labels: These could be your dataset’s rows. Both Column and Row labels can carry data from your columns.
- Value: The Value section permits you to look at your data differently. You can sum, average, count, etc., with your Data rather than just pulling in any numeric value.
How To Hide A Whole Sheet
There might be numerous worksheets (each sheet shown by a tab, present at the bottom, and you can name that) in the file you’re working in it. That’s actually what a semi-advanced person’s typical Excel workbook looks like.
Instead of deleting it, you can hide it, which makes its data accessible not just for reference but also accessible to formulas on various sheets in your workbook.
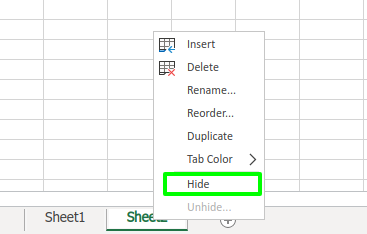
- After right-clicking the bottom sheet tab, you can select “Hide.”
- For finding it again, go to the View tab at the top.
- Tap Unhide and a list will pop up.
- Pick the name of your sheet, and that’s it!
A Hide button is also available on the View tab menu at the top. Now, when you tap that, it will hide the whole workbook that you’re using. It seems you closed the file; however, Excel keeps running.
While closing the program, it asks you whether you want to save all alterations to the hidden workbook. Further, when y proceed to open the file, Excel gives you what seems to be a clean blank workbook till you tap Unhide again.
How to Use Personal Workbook in excel Sheet for Macros
After unhiding a workbook, you might see a workbook listed—the Personal.XLSB file is the personal workbook Excel generated for you.
Whenever you start your Excel, it will open as a hidden workbook. So, what’s the actual reason to use it? Guys, it’s Macros. A macro gets tied to in whichever workbook you created it. By this, we mean it won’t work across every single spreadsheet that you made by default (the way it does in word).
Do you want to mark macro’s availability in all your spreadsheet files? All the time, you need to store the macro in Personal.XLSB.
While recording the macro, select the “Personal Macro Workbook” in the “Store macro in” field. Next, turn on the Developers tab, reach “File tab,” choose “Options,” tap “Customize Ribbon,” and further, check “Developers” in the Main Tabs box, and then tap “OK,” to record a macro.
How to validate data to create Dropdowns
Looking forward to creating a spreadsheet for your teammates/employees to use? The process is simple for creating selections’ dropdown menu in particular cells.
- Go to the Data tab after highlighting the “Data” tab and tap Data Validation.
- Now, after highlighting the cell, reach the Data tab, Under “Allow:” Choose “List.”
- After that, type a list in the “Source:” field, consisting of commas between the options. Also, you can tap the button situated next to the Source field; furthermore, return to the same sheet to choose a specific data series. It’s the perfect way to tackle large lists.
It will work, even if you hide that data later. Data Validation is a perfect way to regulate/restrict data entered—for instance, provide a date range, and folks can’t enter any dates before/after what you specify. Besides that, you can generate the error message they’ll see.
4 Super Cool Excel Tips and Tricks For Pro (How To Use Excel PHASE #5)
No matter you’re a pro; still, you haven’t covered all Cool Excel Tips and Tricks existing, and Excel sheets have got much for you to explore. We’re sure you are unfamiliar with some formulas, and it’s also possible that you are taking “long-cuts” for some tasks! Hassle ends up here! The following fun Excel tricks will increase your mind’s sharpness to the next level!
Using conditional formatting: Making cells automatically change color as per data
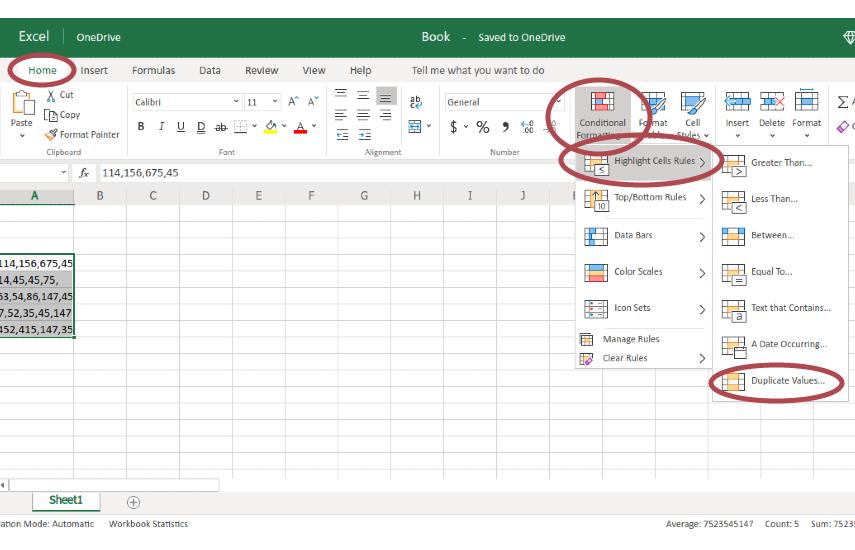
Using Conditional formatting is a considerable part of the modern Excel Tips and Tricks, and by using the feature, you make your data look simpler.
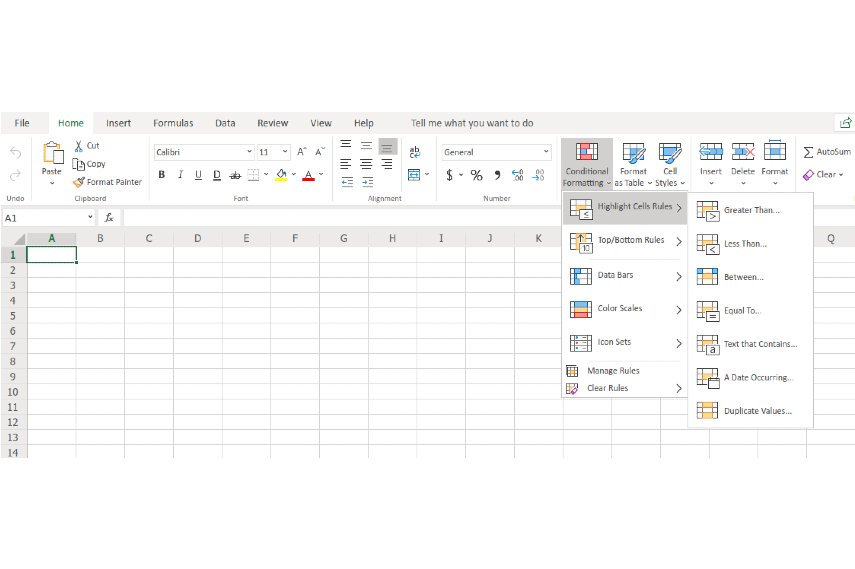
Conditional formatting permits you to change any cell’s color based on info present within the cell. So, for instance, if you want to flag specific numbers that are par average or present in the top 10% of your spreadsheet’s data, you can conveniently do that.
Color coding commonalities among various rows in Excel is also possible. Using that, you can quickly and conveniently see whatever info you find is important to you at a specific time.
- Firstly, highlight the cells’ group you’re willing to use conditional formatting.
- From the Home menu, tap “Conditional Formatting” from the dropdown. (if you want something distinctive, you can generate your own rule)
- A popped-up window will provide deeper info regarding your formatting rule.
- Tap “OK” after you complete it. The results will start appearing automatically.
The benefit of using dollar signs to keep a cell’s formula similar no matter where it moves
If you’re reached the semi-advanced or pro level, you might have certainly seen a dollar sign in some Excel formulae? However, when we use it in a formula, it isn’t representing an American dollar; fewer folks know that! Instead, its purpose is to ensure that the same row and column are held the same no matter you copy the same formula in adjoining rows.
A cell reference — when you touch on cell A5 from cell C5, for instance — is relative by default. It is because you are pointing to a cell situated in five columns to the left, by which we mean C minus A, and in the parallel row (5). So that’s what we call the relative formula.
While coping with a relative formula from one cell to another, it will adjust the formula’s values based on where it is moved.
However, a few times, we are more comfortable with those values staying the same regardless of whether they’re shifted or not. To do that, we have to make the formula in the cell into what we call an absolute formula.
If you want to flip the relative formula (=A5+C5) into an absolute formula, we will precede the column and row values by dollar signs, such as: (=$A$5+$C$5). Wasn’t that simple?
Use the VLOOKUP function to pull data from the sheet’s one area to another.
Now, the case is, you’ve got two distinctive sets of data on two distinctive spreadsheets, and you wish to combine both into a single spreadsheet! For semi-advanced and pro folks, this can be a general need.
For instance, you have a list of your clients’ names next to their phone numbers in one spreadsheet, plus a list of those same clients’ phone numbers next to their respective company names in the other. Now, you want all those people’s names, phone numbers, and company names to be visible in one place.
Now, this can be a part of the job of many readers, and till now, you didn’t know, a sweets shortcut was available! VLOOKUP can be a go-to formula in such a case.
You need to have one column appearing identically in both places before using the formula. Scrub your data to ensure the data’s column you’re utilizing to merge your info is identical, including no extra spaces, and here comes your formula: =VLOOKUP (lookup value, table’s array, column’s number, [range lookup])
NTIF function: Perfect to make Excel count numbers or words in any range of cells
Rather than manually counting how often a specific number or value appears, it’s smart to put that burden on Excel. So instead, excel uses the COUNTIF function to determine home any time a number/word seems in any range of cells.
For instance, let’s say I want to figure out how many times the word “Alexander” appears in my data set.
- The formula: =COUNTIF(range, criteria)
- Our formula carrying variables from our example down there: =COUNTIF(D:D, “Alexander”)
Now, there are several variables in this formula:
- Range: The range means the area we want our applied formula to cover. In this instance, since we’re just focusing on a single column, we use “D:D” to describe that both the first and last column is D. in case we were looking at columns B and D, we’d use “B:D.”
- Criteria: It’s whatever piece or amount of text we want Excel to count. If you prefer your results to be in text form rather than a number, use quotation marks.
In any cell, if you type in the COUNTIF formula and press “Enter,” it’ll show you total how many times the word “Alexander” appears in the dataset.
How To Use Microsoft Excel: FAQ
In our cool Excel Tips and Tricks guide, we have covered all levels, and now, it’s the time to kill some minor difficulties that you come across pretty often. We’ve evaluated the most common questions for you and provided instant solutions!
How to get to the bottom of the Excel sheet
The simplest solution is Ctrl + end. However, some of us prefer utilizing the scroll bar (present on the right) to navigate the sheet’s bottom. Once you reach the bottom, activate any cell in any column where your data is present, and then use Ctrl + up arrow to reach the first non-blank cell, and that’s your last row.
How to copy data from an Excel sheet to another using formula
While copying formulas to another location, selecting formula-specific paste options is possible in the destination cells.
Do the following to copy and paste a formula:
- First, choose the cell with the formula you desire to copy and tap COMMAND + C.
- Next, choose the cell where you want to paste that formula you recently copied.
- You need to go to the other worksheet and click the cell you desire, in case your desired call is in some other worksheet.
- Press COMMAND + V for instantly pasting the formula with its formatting. The other option is to tap the arrow you find next to the Paste button.
- Tapping the arrow provides you with a list of options.
Below are the few options that we commonly use:
- Formulas — If you want to paste the formula but not the original cell’s formatting.
- Formulas & Number Formatting — It’s for just pasting the formula and the number formatting (currency format, percent format, etc.)
- Keep Source Formatting — This option is for pasting the formula, the number formatting, border, font, shading, and font size of the original cell.
- Paste Values — You can paste just the result using this option, excluding the formula.
How to print an Excel sheet in A4 size
Here’s a guide (with just 5 easy steps) helping you in finding the options that permit you to change the paper’s size being used for the worksheet.
- After opening your Excel, tap the Page Layout tab you find at the window’s bottom.
- In the ribbon’s Page Setup section, tap the Size button.
- Tap the A4 option.
- After reaching the file, tap Print or Ctrl + P, which will open the Print menu.
- A4 is selected as the paper size.
However, as per the formatting you previously applied to your worksheet, it may not print perfectly on this particular paper size. What will you do? Just go to the Print menu, and tap the No Scaling button. Now, either go with the option of “Fit All Rows on One Page,” or you can tap the Fit Sheet on the One Page option. Now, that’s the quickest and easiest way to elevate the manner your worksheet data prints.
How to fit the Excel sheet on one page in word?
- After clicking the page layout, tap the small Dialog Box Launcher you find at the bottom right.
- A Page Setup dialog box will appear.
- In the Page Setup dialog box, tap the Page tab.
- Tap “Fit to” under Scaling.
- right-click => AutoFit => AutoFit to contents. You can also choose 1 x 1 (wide x tall) in “fit to boxes.”
- At the Page Setup dialog box’s bottom, press OK.
How to copy an excel sheet into word
Something like three decades back, placing data from Excel into PowerPoint or Word was a bewildering thing to do in the Office Suites’ world. Today, it’s butter on bread, no matter it’s taking data cells or a full-sized chart, copy/paste into the other program.
It would help if you considered it; it’s a link-and-embed process, which means while changing the data in your spreadsheet, it’s going to change in the PowerPoint PPT or Word DOC as well. So to not let that happen, paste it as a graphic. For doing that, the word’s own Paste Special tool is there.
For taking it from Excel, reach the Home tab at the top, choose the Copy menu, and go with the Copy as Picture option present there. Then, you’re free to paste the graphic into your desired program.
How to remove lines in Excel sheet
You’ll always find gridlines visible whenever you’re in an Excel worksheet. So, How to remove lines in an Excel sheet? Follow the steps:
- Reach the Page Layout tab.
- Uncheck the View checkbox you find in the Sheet Options group within Gridlines.
- That removes the gridlines from your Excel worksheet.
Whenever tinkering with the gridlines, you need to follow some considerations:
Using the keyboard shortcut is also a convenient way – ALT + WVG (while hosting the ALT key, enter W V G). Using this shortcut, you can remove the gridlines if they’re visible. Otherwise, it will make them visible.
When you say removing the gridlines, that implies the entire worksheet! This particular setting is determined for each worksheet. So, while removing the gridlines from your one worksheet, gridlines will still appear on all the other worksheets.
Applying a background fill to your worksheet’s cells is also a way to remove the gridlines. You can implement a fill color in a given area if the gridlines are visible. You’ll find that the gridlines have disappeared, and the fill color has taken over.
While applying the fill color to the whole worksheet (You should remove the fill color to ensure the visibility of the gridlines)
How to insert an excel sheet into Powerpoint
- Enter Powerpoint tap objects on the insert tab.
- Tap Create from the file option in the Insert Object dialog box.
- Tap Browser and access Browse box. Find the Excel workbook having the data you desire to insert and link.
- Before closing the Insert Object box, you must choose Link and click OK.
Can I call things from one excel sheet to another
To make Excel insert any reference to another sheet, carry out the following steps:
- First, start typing a formula in the formula bar or the destination cell.
- To add a reference to another worksheet, you have to switch the sheet first.
- Next, choose the cell (or chain of cells) you want to refer to.
- After typing your formula, tap the Enter key to wrap the process.
30+ Super Cool Excel Tips and Tricks in 2023: The conclusion
Microsoft Excel offers an unlimited amount of benefits for any user, no matter whether he is a professional or amateur, and for work or individual use.
A professional may create detailed charts for a meeting, outline a company budget, bring any data together for an overall percentage or other outcomes, and help identify certain trends, among many other uses.
An individual may use Excel for personal reasons such as making contact or grocery lists, organizing budgeting data, sharing spreadsheet data with others, and numerous others.
Excel is not simply just a spreadsheet. Some fresh ways to organize data keep on coming up with new trends, and all the ways to use Microsoft Excel are limitless. You may certainly find another use you didn’t even know about and make organizing life much easier!
We’re sure that our Excel Tips and Tricks will highly help you!
So, believe in trying out, and for that, we’ve brought you the ultimate best Job portal in India! So, tap below and materialize your success into money!

Leave a Reply